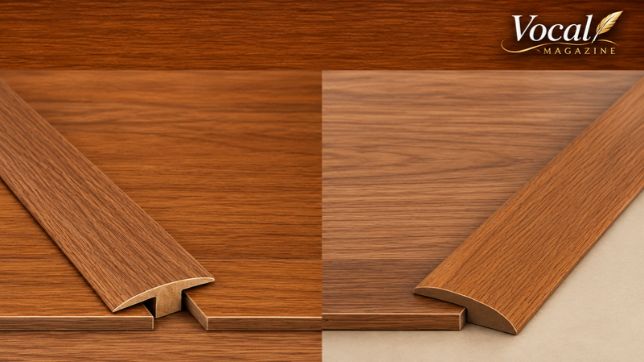
A T molding transition is an essential flooring accessory that creates a smooth and attractive connection between two flooring surfaces. Whether you are installing laminate, hardwood, vinyl, or another type of flooring, choosing the right transition strip helps create a professional finish while protecting the edges of your floors.
T-molding is particularly useful when connecting two floors that are approximately the same height. It covers the expansion gap between flooring sections, provides a clean appearance, and allows floating floors to expand and contract naturally as temperature and humidity levels change.
In this guide, we will explain what T-molding is, where it is used, its benefits, and how to install it correctly.
What Is T Molding Transition?
T molding is a T-shaped transition strip designed to connect two flooring surfaces of equal or nearly equal height. It typically features a narrow stem that fits into a track or expansion gap and a wider top that covers the exposed edges of both floors.
This type of molding is commonly used when two flooring sections meet in a doorway or an open area. It creates a smooth transition without requiring one flooring surface to overlap the other.
T-molding is generally suitable for floors with matching heights or a height difference of approximately 1/8 inch or less, depending on the manufacturer’s specifications.
One of its main purposes is to cover expansion gaps. Floating floors, particularly laminate and some vinyl flooring systems, need room to expand and contract because of changes in temperature and humidity. T-molding helps conceal these necessary gaps while maintaining a neat appearance.
When Should You Use T-Molding?
T-molding is a practical solution for several flooring situations. However, it works best when the two adjoining surfaces have similar heights.
1. Doorways and Room Entrances
Doorways are among the most common locations for T-molding. When two rooms have matching or nearly level flooring, a T-molding strip creates a clean connection between them.
For example, it can connect laminate flooring in a living room with laminate flooring in a bedroom. It also helps cover the expansion space required by floating flooring systems.
2. Open Floor Plans
Large open spaces often require expansion joints to accommodate the natural movement of floating floors.
When flooring extends across a large area, manufacturers may recommend installing transition strips to divide the installation into smaller sections. A common planning reference is approximately 40 to 50 linear feet, although the actual requirement depends on the flooring product and installation instructions.
T-molding can help separate these sections while maintaining a consistent flooring appearance.
3. Connecting Floors of Equal Height
T-molding is ideal when connecting two flooring materials that have the same or nearly the same thickness.
Common examples include:
- Laminate flooring to laminate flooring.
- Hardwood flooring to hardwood flooring.
- Luxury vinyl plank to luxury vinyl plank.
- Laminate flooring to vinyl flooring of a similar height.
It provides a balanced finish and prevents exposed flooring edges from looking unfinished.
4. Covering Expansion Gaps
Floating floors need adequate expansion space around walls, doorways, fixed objects, and other boundaries.
T-molding covers the gap between two flooring sections without preventing their natural movement, provided it is installed according to the flooring manufacturer’s instructions.
Benefits of T Molding Transition
T-molding offers several advantages that make it a popular choice for residential and commercial flooring projects.
Creates a Professional Appearance
One of the biggest benefits of T-molding is its clean and finished appearance. It covers exposed edges and creates a smooth connection between adjoining flooring surfaces.
Allows Natural Floor Movement
Floating floors expand and contract as environmental conditions change. Properly installed T-molding conceals the expansion gap while allowing the flooring to move underneath it.
Protects Flooring Edges
Exposed flooring edges can become damaged through regular foot traffic. T-molding helps cover and protect these edges from everyday wear.
Works With Different Flooring Materials
T-molding is available in different materials, colors, and finishes. This makes it easier to find an option that complements laminate, hardwood, and vinyl flooring.
Provides a Simple Installation Process
Most T-molding systems use an installation track or adhesive. With accurate measurements and the right tools, homeowners and flooring professionals can install them without a complicated process.
Different Types of T-Molding
T-molding is available in several materials and finishes. Choosing the right type depends on the flooring material, room design, and expected foot traffic.
1. Laminate T-Molding
Laminate T-molding is commonly used with laminate flooring. It is available in different colors and wood-look finishes to match popular laminate styles.
2. Vinyl T-Molding
Vinyl T-molding is designed to complement vinyl flooring installations. It can provide a coordinated finish between adjoining vinyl surfaces.
3. Wood T-Molding
Wood T-molding offers a natural appearance and is often selected for hardwood flooring projects. It can be stained or finished to coordinate with the surrounding floor.
4. Metal T-Molding
Metal T-molding provides a modern appearance and is often used in areas where durability is important. Aluminum is a common material for these transition profiles.
How to Install T-Molding Transition
Installing T-molding is relatively straightforward when you follow the correct steps. Before starting, check that the transition profile is compatible with your flooring and that the expansion gap meets the manufacturer’s requirements.
Step 1: Measure the Installation Area
Start by measuring the length of the gap between the two flooring surfaces. Measure carefully to ensure the T-molding covers the entire opening.
Mark the required length on the transition strip. Accurate measurements help prevent unnecessary gaps or uneven edges.
Step 2: Cut the T-Molding to Size
Use a suitable hand saw, miter saw, or power saw to cut the T-molding to the required length.
Follow the manufacturer’s cutting recommendations, particularly for metal or specialized flooring profiles. Make sure the cut is straight and smooth.
Step 3: Install the Track or Apply Adhesive
The installation method depends on the type of T-molding you have purchased.
Track installation: If your T-molding comes with a track, position the track within the expansion gap. Secure it to the subfloor using the recommended screws or adhesive. Make sure the fasteners do not restrict the movement of the floating flooring.
Direct adhesive installation: If the product is designed for direct gluing, apply an appropriate construction adhesive or compatible 100% silicone product according to the manufacturer’s instructions. Apply it only where recommended so the floating flooring remains free to expand and contract.
Step 4: Position the T-Molding
Carefully align the T-molding over the gap between the two flooring surfaces.
For track-based systems, press the strip into the track until it snaps securely into place. For adhesive-based systems, position it firmly according to the product instructions.
Check that the molding covers both flooring edges evenly.
Step 5: Secure and Allow It to Dry
If adhesive is used, apply painter’s tape to hold the molding in position while the adhesive cures.
Follow the recommended drying or curing time before allowing regular foot traffic over the transition.
Step 6: Inspect the Finished Installation
Once installation is complete, inspect the entire strip. Make sure it is level, securely positioned, and free from visible gaps or uneven edges.
A properly installed T-molding transition should provide a clean finish without restricting the natural movement of floating flooring.
Common Mistakes to Avoid When Installing T-Molding
Even a simple flooring project can encounter problems if the transition strip is installed incorrectly.
Here are some common mistakes to avoid:
- Choosing the wrong transition profile: T-molding is intended for floors of equal or nearly equal height. Use a reducer or another suitable profile when there is a significant height difference.
- Using incorrect measurements: An improperly measured strip may leave exposed gaps or extend too far into the doorway.
- Blocking expansion space: Avoid fastening floating flooring to the subfloor or filling its expansion gap with adhesive unless the flooring manufacturer specifically allows it.
- Selecting an incompatible adhesive: Always use an adhesive recommended for the molding and flooring materials.
- Ignoring manufacturer instructions: Different flooring systems have different expansion requirements and installation methods.
Avoiding these mistakes helps improve the appearance, stability, and lifespan of your flooring transition.
How to Choose the Right T-Molding
Selecting the right T-molding involves considering several important factors.
Flooring height: Measure both adjoining surfaces to confirm that they are suitable for a T-shaped transition.
Material compatibility: Choose a molding designed for your flooring type, whether it is laminate, vinyl, hardwood, or another material.
Color and finish: Select a finish that matches or complements the surrounding flooring to create a coordinated appearance.
Installation method: Decide whether a track-based or adhesive-based system is appropriate for your particular flooring installation.
Durability: Consider the amount of foot traffic in the area. A durable transition profile is especially important in busy hallways and commercial spaces.
T-Molding vs. Other Flooring Transitions
Not every flooring connection requires T-molding. Different transition profiles serve different purposes.
- T-molding: Best for connecting two floors of equal or nearly equal height.
- Reducer molding: Used when transitioning from a higher floor to a lower floor.
- End molding: Used to finish exposed flooring edges where a floating floor meets another surface.
- Stair nose molding: Designed to cover and finish the front edge of stairs.
Choosing the correct profile helps ensure a safer and more attractive flooring installation.
FAQs T Molding Transition
1. What Is T-Molding Used For?
T-molding is used to connect two flooring surfaces of equal or nearly equal height. It covers expansion gaps, protects flooring edges, and creates a smooth transition between rooms or flooring sections.
2. Can You Use T-Molding Between Different Flooring Types?
Yes. T-molding can connect different flooring materials, such as laminate and vinyl, as long as their heights are compatible and the transition profile is suitable for both materials.
3. How Much Height Difference Can T-Molding Handle?
T-molding is generally designed for flooring surfaces with matching heights or a difference of approximately 1/8 inch or less. Always check the product specifications before installation.
4. Does T-Molding Allow Flooring to Expand?
Yes. Properly installed T-molding covers the expansion gap while allowing floating floors to expand and contract naturally. The installation must not restrict floor movement.
5. Can T-Molding Be Installed Without a Track?
Yes. Some T-molding products are designed for direct adhesive installation. However, others require a dedicated track. Always follow the installation instructions supplied with the product.
6. Where Is T-Molding Most Commonly Installed?
T-molding is commonly installed in doorways, between adjoining rooms, and across large open flooring areas where expansion joints are required.
7. Is T-Molding Necessary for Laminate Flooring?
It may be necessary when connecting separate laminate flooring sections, particularly at doorways or where the manufacturer’s maximum continuous installation dimensions require expansion breaks. Follow the flooring manufacturer’s guidelines.
Conclusion T Molding Transition
T molding transition strips are a practical and attractive solution for connecting two flooring surfaces of equal or nearly equal height. They help cover expansion gaps, protect exposed flooring edges, and create a smooth finish between rooms and larger flooring sections.
Whether you are working with laminate, vinyl, or hardwood flooring, choosing the correct T-molding and installing it properly can make a noticeable difference in the final result.
By measuring accurately, selecting compatible materials, and following the manufacturer’s installation instructions, you can achieve a durable and professional-looking flooring transition.
T Molding Transition T Molding Transition T Molding Transition T Molding Transition T Molding Transition T Molding Transition T Molding Transition T Molding Transition T Molding Transition T Molding Transition T Molding Transition T Molding Transition T Molding Transition T Molding Transition T Molding Transition T Molding Transition